


Is this you?
✓ Flossing never sticks. → StreamSmiles makes it effortless , no mess, no excuses.
✓ No time for a longer routine. → StreamSmiles takes 60 seconds flat.
✓ Sick of health products collecting dust. → This one actually gets used.
-

30-Second Clean
-

3 Pressure Modes
-

Weeks of Battery


FREE SHIPPING
30 DAY RISK FREE
SAVE 50$ ON BUNDLE
FREE SHIPPING
30 DAY RISK FREE
SAVE 50$ ON BUNDLE
FREE SHIPPING
30 DAY RISK FREE
SAVE 50$ ON BUNDLE
FREE SHIPPING
30 DAY RISK FREE
SAVE 50$ ON BUNDLE
FREE SHIPPING
30 DAY RISK FREE
SAVE 50$ ON BUNDLE
FREE SHIPPING
30 DAY RISK FREE
SAVE 50$ ON BUNDLE
FREE SHIPPING
30 DAY RISK FREE
SAVE 50$ ON BUNDLE
FREE SHIPPING
30 DAY RISK FREE
SAVE 50$ ON BUNDLE
FREE SHIPPING
30 DAY RISK FREE
SAVE 50$ ON BUNDLE
FREE SHIPPING
30 DAY RISK FREE
SAVE 50$ ON BUNDLE
FREE SHIPPING
30 DAY RISK FREE
SAVE 50$ ON BUNDLE
FREE SHIPPING
30 DAY RISK FREE
SAVE 50$ ON BUNDLE


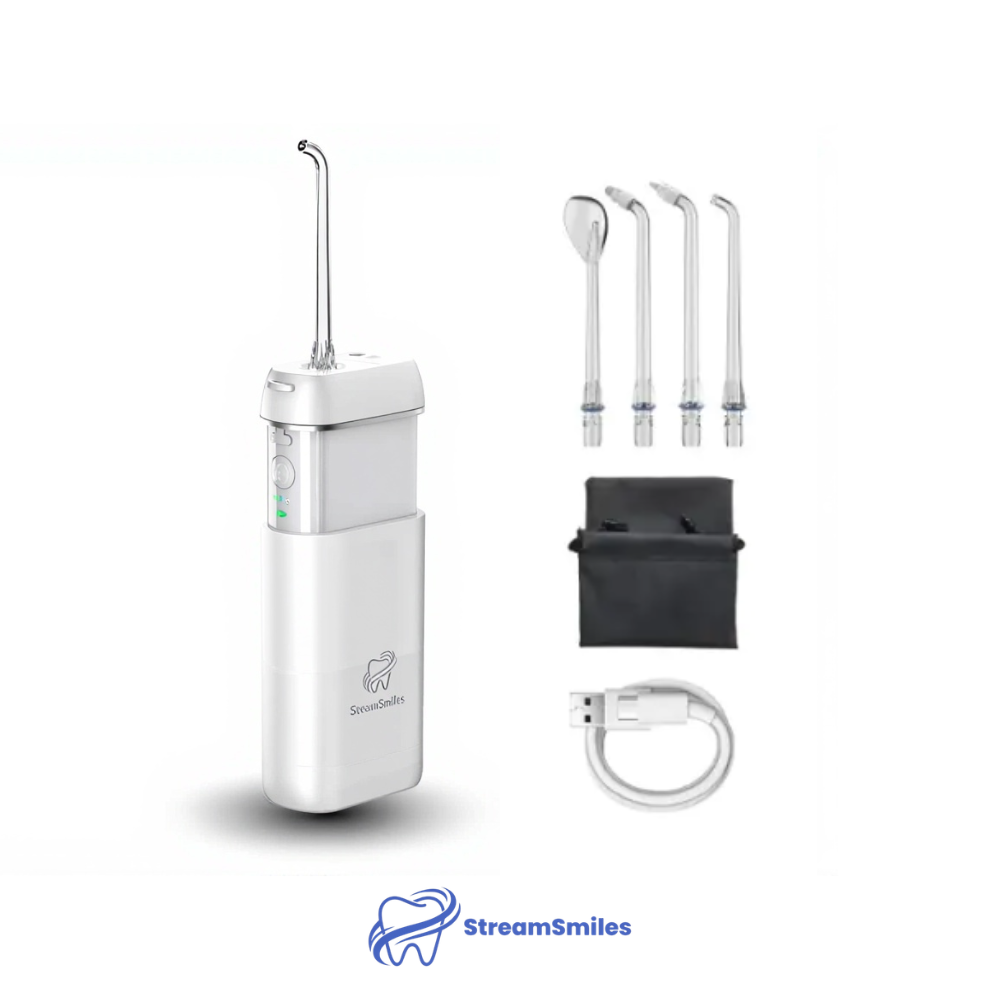
StreamSmiles Portable Water Flosser
StreamSmiles Portable Water Flosser
BUNDLE & SAVE
Couldn't load pickup availability


Why People Actually Stick With It


There's a Reason You Keep Skipping It
It's awkward. It's messy. It takes too long.
If you've got braces, it's nearly impossible. Sensitive gums? Painful.
And those countertop water flossers? Loud, bulky, and take up half your bathroom.
So you skip a day. Then two. Then your dentist gives you that look again.
The problem was never you. The problem was your options.

String Floss Wasn't Built for Busy People.
Both hands occupied. Fingers jammed in your mouth. String cutting into your gums.
It never gets easier — so you skip it.
StreamSmiles replaces all of that with one button press. No string. No mirror. No mess.
30 seconds and every tooth is done.

Pocket-Sized Clean. Anywhere You Go
Fits in your bag, your drawer, your carry-on. No base. No tank. No cords.
Same deep clean as those countertop machines — without giving up half your bathroom.
USB-C charging. 2-3 weeks of battery. Fully waterproof for shower use.

Reach What String Floss Can't. Clean the Whole Mouth.
Back molars, tight gaps, behind braces — string floss skips all of it.
That's where plaque hides and breath goes stale.
You'll see debris wash out from spots you didn't even know were trapping food.

Deep Clean. Zero Bleeding.
Flossing makes you bleed, so you stop. Then your gums get worse.
StreamSmiles breaks that cycle. Start on Gentle mode and work up as your gums heal.
No thread dragging across inflamed tissue. Most users see less bleeding within a week.

Dentists Have Been Saying It for Years.
Water flossers aren't a trend — over 50 years of clinical research backs them.
They reduce gum bleeding up to twice as effectively as string floss and reach spots string can't.
No technique to master. No learning curve.
This isn't a gadget. It's what your dentist wishes you were already doing.

Fill the Tank
Slide the water reservoir down to its full length. Find the small hatch on the side and swing it open (it hinges). Fill the 150ml tank with warm water, which gives you 45 seconds of cleaning power.

Choose Your Pressure
With the device off and tank empty, long-press the power button to cycle through the different pressure settings. We recommend starting with "Gentle" (green light) or "Pulse" (white light) if you're new to water flossing. Important: Select your mode first before powering on.

Position the Tip
Lean over the sink and place the tip inside your mouth. Close your lips around the nozzle to prevent splashing, but keep them slightly parted so water drains naturally into the basin. Angle the flosser down toward the sink to avoid splashing counters or mirrors.

Turn On & Clean
Short-press the power button to start (the button is sensitive, so grip the body gently). Glide the tip along your gumline at a 90-degree angle, pausing 1 second between each tooth.
Why Customers Make the Switch
Everything they promise. Everything they don't deliver.
| streamsmiles | Others | |
|---|---|---|
| Fully waterproof shower safe | ||
| Compact foldable design | ||
| 3 Adjustable pressure settings | ||
| Fully cordless | ||
| Easy to use | ||
| 2-3 weeks battery life |
There's a Simpler Way. This Is It.
Common Questions
How does the 30-day guarantee work?
How does the 30-day guarantee work?
Simple. Try StreamSmiles for 30 days. Use it, test it, travel with it. If you don't love it for any reason, reach out to us and we'll refund every penny. No forms, no return shipping hassle, no questions asked. We take the risk so you don't have to.
How do I clean and maintain it?
How do I clean and maintain it?
Empty any remaining water from the tank. Separate the reservoir from the main body and let both parts air dry completely. This prevents mold from forming inside the device.
How do I charge it?
How do I charge it?
Connect the USB cable to the charging port (under the rubber gasket). A full charge takes 3-4 hours and lasts 2-3 weeks with daily use.
Is it safe for braces?
Is it safe for braces?
Yes — it's actually better than string floss for braces. The water jet cleans around brackets, under wires, and between teeth without snagging or pulling. No risk of popping a bracket like you get with traditional floss. Orthodontists recommend water flossing for braces because it reaches spots string floss physically can't.
Will it hurt my sensitive gums?
Will it hurt my sensitive gums?
Not at all. StreamSmiles has three pressure modes — Gentle, Strong, and Pulse. Start on Gentle and you'll barely feel it. As your gums get healthier you can increase the pressure. Most users with sensitive or bleeding gums see improvement within the first week. Water pressure cleans without the scraping and friction that makes string floss painful.
What if my kid won't use it?
What if my kid won't use it?
That's exactly why we built it this way. It feels like a gadget, not a chore. Press a button, aim, 30 seconds, done. No threading, no mirror needed, works in the shower. Parents tell us their kids actually ask to use it — which is something string floss has never achieved. And if it doesn't work out, you're covered by our 30-day money back guarantee.